Industrial radiography (RT) is a time-tested technique for examining a welded joint and the heat-affected zone after manufacturing. But RT has obvious limitations: it’s insensitive to mis-oriented planar defects, it does not provide immediate feedback to the welders, and it’s disruptive to other work at the job site. Radiography presents important safety concerns as well.
Codes, standards, and technology have evolved to allow the use of phased array ultrasonic testing (PA UT) in lieu of RT for the inspection of austenitic welds. First adopted on a wide scale at nuclear power plants nearly 15 years ago, the use of dual (2D) matrix array probe assemblies has expanded to oil and gas and other industries where fast, reliable, safer inspections of highly attenuating austenitic welds are necessary.
2D Matrix Techniques
The latest portable phased array units with powerful embedded software allow inspections with 2D matrix array probes to be set up, deployed, and interpreted quickly and efficiently, eliminating the need to import focal law files created with an external calculator or to remote-control the system using advanced PC-based software.
Examination techniques based on 2D matrix array probes today can provide excellent inspection capability on both circumferential and axial flaws in stainless steel and dissimilar metal welds. Standardized dual 2D matrix array configurations can effectively cover the examination volume for stainless steel welds with the weld cap in place, and also allow the detection of planar and volumetric flaws.
UT examination procedures typically involve dual 2D matrix arrays placed on exchangeable wedge assemblies, contoured to match the OD surface of the considered component. Low frequencies are used—1.5 MHz for the inspection of dissimilar metal welds and other attenuating materials, and from 2 MHz to 3.5 MHz for homogeneous wrought stainless steel base material and welds.
The dual T/R (transmit/receive) configuration offers the following benefits: absence of near-surface “dead-zone,” elimination of “ghost echoes” caused by internal reflections in the wedge, and finally better sensitivity and SNR (signal-to-noise ratio) due to the convolution of T and R beams.
Let’s look at PA UT techniques for a manufacturing inspections of austenitic stainless steel welds.
Flaws Parallel to the Weld
When performing manufacturing inspections in lieu of RT, the examination needs to cover the complete wall thickness of the weld volume and heat-affected zone. Most often, the weld cap will be in place. In carbon steel welds, shear wave beams are recommended to insonify the examination volume from two sides, and the second half skip will often be used to obtain specular reflections from defects in the weld bevel.
Figure 2: Design of 2.25 MHz dual 10 x 3 matrix array (TRL)
Similar shear wave techniques, at lower frequencies, can be used to inspect the near-side bevel region of stainless steel welds but are not reliable for examination through austenitic weld material. Also, for so-called CRA welds, a corrosion-resistant alloy clad is present at the ID of the carbon steel pipe, and the second half skip from shear wave beams cannot be used effectively.
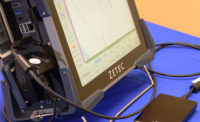
Let’s look at a sample inspection technique using a portable PA UT instrument and software, as shown in Figure 1.
Dual 2D matrix array probes, generating refracted longitudinal wave beams from 30 to 85 degrees, can be used to completely cover the examination volume. For wall thicknesses between 15 and 50 mm, a frequency between 1.5 and 2.25 MHz is considered appropriate, depending on the base material attenuation.
By optimizing the wedge angle, and the element configuration of the matrix probe, it is possible to efficiently generate the large sweep of refracted angles without relevant side lobes (Figure 2). The footprint of the wedge assembly in the incidence plane is kept to a minimum; this allows for positioning the beam exit points as close as possible to the weld.
Test Specimen: 304 SS Plate Weld
The performance of the standard 2.25 MHz dual 10 x 3 matrix array in TRL mode was evaluated on a 304 stainless steel plate weld, with a wall thickness of 25 mm. The test specimen has a typical V-bevel and “as-welded” surface condition, and contains realistic and well-documented welding defects, oriented parallel to the weld.
Figure 3: Phased array merged data from standard 2.25 MHz dual 10 x 3 matrix array (TRL) on 304 SS plate weld.
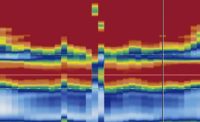
Figure 3 shows an image of the merged phased array data from all refracted angles (from 30° to 85° LW) for the whole weld length. Data acquisition was performed at low gain setting, to avoid saturation on flaws with high-reflectivity. The 16-bit data resolution allows using appropriate soft gain setting for various defect types. Data interpretation can be facilitated by adequately positioning the projection gates.
Figure 4: VC-End Views of merged data from individual flaws, detected from one side of the weld.
Images from the individual flaws, generated with the same merged data group, are shown in Figure 4. Let’s examine the results:
- A lack-of-fusion defect on the near-side of the weld is detected through non-specular reflections of the upper and lower edge.
- An incomplete penetration defect (1.5 mm high) is easily detected and discriminated from the regular root echo; in fact, the low refracted angles also provide good detection capability on ID cracks, on both sides of the weld; tip signals can be resolved for accurate sizing of small cracks from the near-side of the weld.
- The high-angle longitudinal wave beams provide excellent detection of a near-surface crack, without any noise from side-lobe signals.
- A cluster of porosity, in the center of the weld material can be well detected, and demonstrates the propagation capability of the longitudinal wave beams through weld material.
Axial crack detection in stainless steel welds with cap
If you don’t want to remove the weld cap prior to the examination, there’s an alternative inspection technique you can use to detect axial (transverse) cracks in pipe welds: single matrix array probes in pulse-echo mode can be used to “skew” the sound beam under the weld cap. Since the sound beam essentially propagates in base material, shear waves can reliably detect flaws at the near-side of the weld.
Ideally, the weld should be inspected with four beam orientations (Figure 5), and two symmetrical wedge assemblies are required to examine from opposite directions, i.e. clockwise and counter clockwise. Depending on the frequency and the size of the individual elements of the array, wedge assemblies can be optimized to generate shear wave beams with refracted angles between 40° and 65°, and four or five skew angles between 25° and 50° relative to the scan axis direction. More than 50 acoustic beams are fired at each search unit position. The definition of focal law groups with different skews is easily handled by a sophisticated PA UT instrument with an on-board calculator, as shown in Figure 6.
Figure 5: Inspection technique for axial cracks with weld cap in place.
A two-line inspection sequence is often used to fully cover the examination volume. The axial positions of the two scan lines are determined as a function of the pipe thickness and the weld crown width. The first scan line, as close as possible to the weld crown toe, aims for flaws located near to the weld root, whereas the second scan line completes the coverage of the heat-affected zone. The footprint of the probe assemblies will be optimized to bring the beam exit point as close as possible to the weld crown toe without generating major internal reflections in the wedge.
Figure 6: Setting up inspection for axial cracks with weld cap in place.
This examination method was found quite effective for the detection of mis-oriented axial flaws. Figure 7 shows the phased array images obtained on an axial crack in a stainless steel weld: the flaw is detected with various skew angles, and a high SNR can be observed.
Figure 7: Phased array merged data (various SW angles & skews) from axial crack in SS weld: regular Projection Views (left) and Polar View (right).
The benefits of advanced PA UT in lieu of radiography continue to draw attention in oil and gas, power generation, manufacturing, and other industries that depend on reliable austenitic weld inspections. Likewise, fully integrated PA UT instruments, powerful onboard software, and 2D matrix array probes continue to make these inspections more cost-effective and efficient.

